14 December 2021

5 Clean-Up Tips After A Kitchen Renovation Project


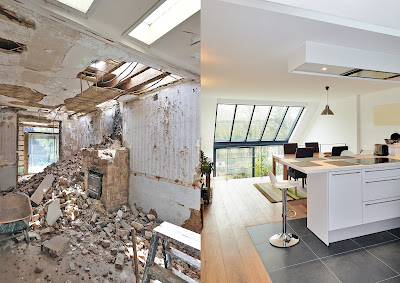
Renovating your kitchen is, indeed, an exciting thing to do. Nothing beats the thrill of finally seeing the finished output. However, as much as you want to fully use your newly renovated kitchen, you first need to go through a series of steps that comprise general cleaning. 

Cleaning up a room that's full of construction debris can be tricky and challenging. It's undoubtedly not an easy task with all the dust, toxic fumes, and harmful objects that you have to go through. 

If you're facing the same dilemma, you just got to the right place. This article will guide you on how to effectively clean up after a kitchen renovation project. Below, check out the five smart clean-up tips for a squeaky clean, new kitchen. 

1. Rent A Bin For Debris Disposal 

First things first, rent a bin so you'll have a container to put all your trash.  

Before even rolling your sleeves and diving into the action of a general clean-up, one of the most important things you should do is rent a bin. Unfortunately, not all contractors are willing to care for the post-renovation mess. That's why you have to rent a crate due to the following reasons: 

  • Your regular trash container won’t be enough 

Major renovations, such as a kitchen renovation project, will surely leave you with a mountain pile of trash and debris. However, they’ll never fit in your trash bin due to their size and amount. 

  • You have to abide by governing rules regarding trash disposal 

Another critical thing to note are the rules and regulations given by your local government regarding proper trash and debris disposal. According to Same-Day Rubbish Removal, it's necessary to dispose of your garbage in the most eco-friendly way. Doing so ensures that you don't harm the environment. 

Therefore, a primary thing to do is to rent a bin and secure a container to put all your trash. 

2. Prepare Your Cleaning Tools And Protective Items 

Secondly, you need to prepare the appropriate cleaning tools. Renovations like kitchen remodeling involve cement, paint, and other toxic chemicals that can be harmful to the body when inhaled. Therefore, it's best to have the right tools and appropriate protective items, such as: 

  • Face masks 
  • Hand gloves 
  • Goggles 
  • Soft towels and fabrics 
  • Used dryer sheets 
  • Gentle cleaning solution 
  • A vacuum + one or two extra filters 
  • A broom and a dustpan in case a vacuum isn't available 

Preparing the above mentioned materials beforehand will help you do the cleaning faster and wiser. 

3. Dispose Of Construction Debris And Trash 

Now that you’ve prepared everything you need, it's time to dispose of all the debris and trash from the construction. These can be giant concrete piles, countertops, wood scraps, broken hardware, and other types of waste.  

Make sure to wear your gloves, face mask, and goggles to keep you safe from unwanted dangers. Clearing off the area from these large pieces of debris will pave the way for the next steps to follow. 

4. Clean Your Air Vents And Filters 

One of the areas where dust has possibly accumulated is in your air vents and filters. Take note that this can be hazardous to your health and threaten your lungs. Therefore, make sure to thoroughly clean this so that you and your family won't be inhaling air that's full of chemicals and dust particles.  

5. Make Use Of Your Vacuum 

The next thing to do is make good use of your vacuum machine. Construction dust can be very fine and will surely get everywhere. Make sure to give adequate attention to every single corner of the room. Dust is usually hiding even in the darkest corners of your room, such as underneath your furniture and window frames. 

It'd also help to constantly check your vacuum filter while in use. Dust can be overwhelmingly plenty that it could fill up your vacuum filter right away. 

6. Wipe Down Every Single Thing

The last thing to do to secure a dust-free and spotlessly clean kitchen area is to wipe down every single thing. An old towel and a bucket of water with a gentle cleaner will usually do the trick. Ensure to wipe all corners, items, furniture, countertop, shelves, and the like.  

After wiping comes floor mopping. Use a gentle floor cleaner appropriate for your floor material, and ensure that you've thoroughly mopped the space from wall to wall. 

Conclusion

Renovation clean-up can be stressful, especially if you don't know where to start. The mountain-high amount of debris and dirt can surely overwhelm you. However, with the help of rental bins and your appropriate cleaning tools, effective cleaning is never impossible.  


Considering these five easy steps for an effective clean-up will surely bring you closer to your newly renovated kitchen, which will be ready for use after a day or two. 

11 December 2021

10 Tips to Help You Choose the Right Moving Company

Photo by Erda Estremera on Unsplash

Moving from one location to another is full of hassle and stress. It's not an event where you call for a service provider, and the rest is done. Even when moving locally, experts say that you should sell furniture and other items as much as possible and buy brand new stuff upon arrival. However, if you decide to move your belongings, hire the right moving company. Here are some tips to help you choose the right moving company.

Have Multiple Estimates

A mover's rate can vary based on the company's location, their reputation, and how busy they are. Try to get multiple estimates from different companies in your area. But ask them to give calculations based on an in-person inspection of your house or via video survey. Never take a moving estimate on a phone call. An in-person inspection is essential for getting precise quotes. Other than that, some companies may charge you more than your budget, and you can choose the most accurate one from different options.

Ensure The Company Is Legit

There are a lot of scam companies. And you don't want to end up being scammed. So make sure the company is authentic. If you can spare some time, pay a visit to the company. Are their trucks appropriately labeled? Search on SaferSys Web site to ensure if their given address matches with the website's address. You may ask your state's transportation authority to check if their license is up-to-date.

Read Online Reviews and Ratings

Don't forget to check online reviews and ratings from customers. A good moving company will do everything to keep its online reputation by offering the best services to its customers. So look into a trusted website to see how people reacted to their services and their ratings. Stay away from companies with many negative reviews and low ratings.

Never Cash In a Large Deposit

Stay away from moving companies that ask for advanced cash-in. Generally, prominent companies don't ask for a cash-in or a large deposit before moving. Instead, you should pay after you get the work completed. You will lose control over your move if you pay earlier. In addition, you might lose your belongings if the company is a scam. Finally, always deposit using your credit card to avoid fraud even if you want to spend.

Pay Attention To Your Contract 

Before you put your signature on the contract, read everything in it carefully. Watch for the mover's estimate on the form, and check they have reasonably added all the necessary costs. Next, see if any items are missing from the record. For example, suppose you forgot to list your mini-fridge; you will lose it forever if it gets missing. You can't complain about any loss or damage if it was not listed on the document. Finally, and most importantly, never sign any blank contract. 

Have an Insurance

It is better to keep your valuables protected even if you don't want to use the insurance offers from the movers. As accidents may happen at any time, they will bring you losses. Usually, moving companies provide two types of valuation coverage. 

The first one is Full Value Protection. The benefit of insurance is that if the movers lose or damage any item, they have to repair the item to the same condition or replace it with another one of the same quality. 

Another one is the Alternative Level of Liability when it's cheaper, covering 60 cents per pound. For example, suppose you lost your TV, which weighs 20 pounds and costs $400; if it is lost or damaged, you will receive only 12 dollars (60 cents x 20 pounds). Insurance provides minimal protection for your valuables. 

Reduce Packaging Costs

It's better to pack things by yourself. In this way, your items will be safe with your careful packing. But if there is any damage during transit, the mover usually will not take any responsibility. 

Moving companies generally offer packing services. But you may end up paying an exceedingly high price for boxes and packing materials along with time and labor. Always ask about how they do the packaging and the packer's experience. In such a manner, you may be able to save your belongings from any unwanted damage.

Look Out For Any Additional Cost

Are you moving from a 2-story house? Or is the apartment you just bought on the 8th floor? If your old and new homes are both on the ground floor or first floor, then it's okay. But if it's not, then movers may end up charging extra for stairs and elevators. Other than that, if your street is narrow for a moving van, they might charge you extra bucks for transferring your stuff with a smaller truck. In any event, get a clear view of everything from the movers.

Report Any Mess

After your move, open each box carefully and look for any problems that might have occurred during transit. Write down any issues with the moving company's bill of lading before you put your signature on it. If you open your box a year later and find any problem, you can't report your problem and claim compensation. You have to say any issues within nine months for an insurance claim. 

Watch Out For Red Flags

Beware of the company having these issues:

  • Ask for a large deposit.
  • No written estimates.
  • Request you to sign a document that is blank or incomplete.
  • Problem with the physical address

Follow the tips mentioned earlier to enjoy moving without any scams and problems. Sparing a few minutes might save you from any unwanted loss.

07 December 2021

The Ultimate Guide To Decluttering Your Home


Is it becoming a difficult task for you to find an item, especially when you’re in a hurry? This is a tell-tale sign that you need to declutter your home. Think of decluttering as a stress- reliever for you, an excellent motivator as you take on this task. Decluttering frees up space in your home, preventing it from feeling cramped. As you pull the mess in your home, keep in mind to do away with any item that doesn’t reflect your current wants and needs. This article will help you to remove clutter from your house.

1. Create A Timeline

Having a timeline for your decluttering process will prevent you from spending too much time in one space. Depending on the size and the amount of clutter in the room, allocate a time frame for each area. Setting such goals helps you focus on the task at hand.

2. Set Up Sorting Boxes

When you declutter, remove all your possessions and sort each item one by one. Take this time to decide what to do about them. Prepare three large boxes and label them ‘daily’, ‘occasional’, and ‘no use’. As you remove items from their storage spots, place them in the boxes where they each belong. This will help you remove what you don’t need. Put back the items in the daily use box in your storage places. For those used occasionally, put them away for storage and label the contents of each box for when you need them. Depending on their condition, decide whether to donate, upcycle, or throw away items in the ‘don’t use’ box. Don’t worry about disposing of too many things. There are Same-Day Rubbish Removal services that could help you. Let your focus remain on the decluttering process.

3. Adopt The 80% Rule

The 80% rule states that no items should occupy more than 80% of the room’s space. This rule will help you decide on the number of things you should keep, especially in your bathroom and living room.

4. Declutter Room By Room

Removing clutter room by room will quicken the process and ensure you don’t forego any spaces. Start from the smallest room to the largest room; this will help you progress in your decluttering activity. Starting with a large room might take forever, making you give up along the way and not achieve the ultimate goal of decluttering your home. 


Here’s how to declutter the following spaces in your home:

  • Bathroom

Start by removing all the items in your drawers and storage spaces, including your shower. Sort your products and identify those already expired, including medications. Remove old, worn-out towels. Place each item in its respective sorting boxes. After sorting all the things, put back those you’ve placed in the daily use box and arrange them neatly. Put items of the same purpose together. Consider using hooks to add to your storage spaces.

  • Bedroom

Empty all your wardrobes, including your bedside table. Remove books and decorations placed on your bedside table. Get rid of the books that you’ve already read or diaries you've filled up. Sort out these items, including your clothes, and put them in their respective boxes. Consider sorting your clothes item by item. This means looking at all your trousers and identifying those you don’t need, going to your dresses next, to your shoes, until you sort each clothing item. Once done, hang back the items in your daily use box, and arrange the room. For the clothing items in the ‘don’t use’ box, upcycle those not worn out by creating rugs or making throw pillows out of them.  

Consider creating zones in your wardrobe for easy access to your clothes. Have an area for your t-shirts, another one for your trousers, jackets, and so on.

  • Living Room

Repeat the same process here. Provide extra storage space for your regularly used items, such as the remote and magazines, instead of having them strewn on your couch. Remove any electronic gadgets that you no longer use or don’t work.

  • Home Office

Empty all your drawers and sort the items into their boxes. Offices tend to have a lot of paperwork; your office is no exception. Sort out each paper, such as documents and receipts, in your office. Get rid of the paperwork you don’t need, and arrange those you need in a filing system.

  • Kitchen

Repeat the same procedure of emptying your storage space and sorting each item. Besides sorting your kitchen items based on their use, reduce the number of each kitchen utensil. It’s impractical to have ten knives in your kitchen cabinet. Decide how many you need and donate the rest.

5. Practice The One In, One Out Rule

This rule guides your shopping habits and helps you avoid cluttering your house again. The rule says that each item you purchase should replace an already existing one. If you buy a jacket, you have to let go of one of the jackets in your closet. This can be applied to all the spaces in your home.

6. Designate A Put Away Box

It’s close to impossible for you to declutter your home daily. Provide a large box where you’ll put the items cluttered around the house, such as toys and accumulated mail. Whenever you can, return the things to their designated areas and boxes.

Conclusion

Decluttering your home can be a fun activity. By following the guidelines given, you’ll manage to remove the clutter from your home quickly. You’ll also work to keep clutter from your home, keeping it clean and organized.

05 December 2021

4 Factors To Consider When Choosing The Right Water Tank Size


Water tanks come in many different colors, shapes, materials, and sizes. While some people opt for small tanks for emergency use, others might be looking for big tanks to meet irrigation and household demands.

If you’re planning to buy a water tank and want to know which is best suited for your needs, the obvious answer is the bigger a water tank is, the more water you can store. However, if you don’t want to be confused with the many different sizes of water tanks available in the market, make sure to keep the following factors in mind:

1. Determine Rain Harvesting Capacity

Know how much water your catchment place can produce and determine the rainfall in your area. Depending on the size of your house, you may collect thousands of liters of rain per month. But, this amount may even fall in several days. Each area is different, so you might want to ask your region’s meteorology department to know the exact rainfall. 


When you know the rainfall and catchment area in your place, calculate the number of liters of rainwater you'll collect. You might also need to make a judgment on how much overflow is acceptable once it pours. 

Knowing how much water you’ll consume may also help. Every person in your house may use a few hundred liters daily, but water restrictions may lessen it.

2. Space 

When selecting the right water tank size for a new water tank replacement, another factor to consider is your property’s space. How much space do you have for it? Keep in mind that water tanks range in size from a hundred liters to a thousand liters. The more water that tanks hold, the more space it’ll require. 

If you have a lot of space, you can install water tanks wherever they’re convenient for you. But, if you have limited space, you might want to opt for an easy-to-conceal small water tank like a bladder tank, which may go under a deck or a house. You can also choose a water tank suitable for an underground installation. 

The location of where you’ll install the tank may also help you determine the right type of tank for you. This may also help you know whether or not you need more than one tank. So, don’t forget to consider the space of your property when choosing a water tank size.

3. Council Water Tank Size Requirements

Some factors that may be overlooked when considering the right water tank size for your needs are your local council's requirements. Several councils may need you to:

  • Minimum water tank size capacities for new houses
  • Detain rainwater to help with stormwater drainage during the heavy storms
  • Retain rainwater to combat bushfires if you’re living in a prone area

Water tank and new house requirements may often be found on your local council’s official website. If possible, consult your local council before proceeding with a new water tank purchase, particularly if you’re constructing a new house. This will ensure that you comply with the necessary requirements.

4. Water Usage And Needs

Knowing your water needs and usage helps you understand the rainwater you need to harvest for daily use. If you’re living in a region with mains water, your previous water bills may give you a clue about your daily water consumption. Hose meters may also help you calculate the water volume you usually use for outdoor activities.

Every day, the average water consumption of every person may vary from one place to another. The simplest way to calculate your water needs or usage is by using a rainwater harvesting calculator, which allows you to choose the usual tasks you use water for to determine how much you need.

What Type Of Water Tank Should You Buy?

Plastic water tanks come in various sizes. The good thing about them is that they can be transported without the need for special permits. Plus, they can be installed quickly. Just ensure to purchase a plastic water tank made from quality material and not something made from clear plastic as they may allow algae to grow inside. 

Concrete tanks, on the other hand, are also an excellent option. However, they should be installed by qualified contractors to ensure they don’t have other failures or develop cracks. Concrete tanks are typically available in 5000 gallons and 10000 gallons. While fire-resistant, the cost is significantly more than the plastic alternative and may require a permit to install.

Conclusion

Choosing the right water tank size for your needs is never easy, especially if many options surround you. To avoid buying the wrong one, always note the above factors when you’re shopping around. Such factors will serve as your guide and allow you to experience greater peace of mind. If you still can’t determine which water tank size is right for you, don’t hesitate to ask professionals or experienced dealers.