Showing posts with label how-to. Show all posts

08 March 2010

More Not So Big Solutions For Your Home


Sarah Susanka sits in a place of honor in my personal pantheon. I'm not kidding when I credit her with the inspiration to embark on my career. She and Marc Vassallos released Not So Big Remodeling last year and I covered it pretty thoroughly here, here and here. That last here is an interview I did her last year. I'm not one for being star struck, but I lack words to describe the thrill it was to pick up the phone and call a woman who looms so large in my psyche.

So here we are a year later and Sarah has another new book. More Not So Big Solutions for Your Home hit the shelves last Tuesday, though I've had a review copy for about three weeks. The new book is a collection of articles she's written for Taunton Publishing's Inspired House and Fine Homebuilding.


A year ago, she and I had a wide-ranging conversation and we talked a lot about the state of housing in the US. I asked her what she though would be the fate of people who were currently stuck in poorly-built, soul-less McMansions now that the housing market had collapsed. She thought for a moment and said that how to "humanize" a McMansion was definitely a topic for another book

Well, that other book is here and in the course of More Not So Big Solutions' 154 pages, she offers guidance and advice on how to imply a ceiling in a room that's too tall, how to unify an interior with horizontal trim and where to put the TV among many other topics she covers in this wide-ranging and practical book.


She spends some chapters addressing how to design a kitchen island, a guest bedroom and a functional laundry room. She discusses how to pick wall colors, how to squeeze in a half bath and where to put the smoke detectors. Every point she makes is illustrated with Sarah's own renderings, some of which I'm re-printing here. What's not represented by a rendering is covered by the lush photography Taunton Press and the Not So Big books are famous for.


All of this advice is written in the calm, clear cadence she uses when she speaks. Everything, and I mean everything, is an opportunity in her world and that's an infectious perspective. You can see Sarah's entire collection of essays, books, videos, blogs and forums on the Not So Big House website.

If you're looking for some guidance on how to adjust the scale of your home or just some encouragement to make your home look like it's yours, More Not So Big Solutions for Your Home is a perfect addition to your library.


28 February 2010

Sunday brownie Sunday


I found the basis of this recipe on the fantastic website Smitten Kitchen and have been tweaking and perfecting it for the last few weeks. Deb Perelman (who is the voice of Smitten Kitchen) pronounced these the Best Cocoa Brownies. I'll take it a step further and pronounce them the best damn brownies I've ever made or tasted anywhere. They have the perfect texture, Deb Perelman describes it as "chewy and candy-like." She's right. One of these babies with a cup of coffee in the morning and that's what I call the breakfast of kings.

Brownies made with cocoa have a richer flavor, and by the time you add in the semi sweet chips what you're in for is a bittersweet chocolate fantasy. Really. These things are a snap to make, all it takes it a little patience and about 45 minutes. Life's too short to eat crap out of a box. Remember that.


10 tablespoons unsalted butter
1 ¼ cups sugar
1 cup unsweetened cocoa powder
½ teaspoon salt
1 teaspoon pure vanilla extract
2 large eggs, cold
½ cup all-purpose flour
½ cup chopped walnuts
½ cup semi sweet chocolate chips

Position a rack in the lower third of the oven and preheat the oven to 325°F. Line the bottom and sides of an 8×8-inch square baking pan with parchment paper or foil, leaving an overhang on two opposite sides.

Combine the butter, sugar, cocoa, and salt in a medium heatproof bowl and set the bowl in a wide skillet of barely simmering water. Stir from time to time until the butter is melted and the mixture is smooth and hot enough that you want to remove your finger fairly quickly after dipping it in to test. Remove the bowl from the skillet and set aside briefly until the mixture is only warm, not hot. It looks fairly gritty at this point, but don’t fret — it smooths out once the eggs and flour are added.

Stir in the vanilla with a wooden spoon. Add the eggs one at a time, stirring vigorously after each one. When the batter looks thick, shiny, and well blended, add the flour and stir until you cannot see it any longer, then beat vigorously for 40 strokes with the wooden spoon or a rubber spatula. Stir in the nuts and chocolate chips. Spread evenly in the lined pan.

Bake until a toothpick plunged into the center emerges slightly moist with batter, 20 to 25 minutes. Let cool completely on a rack.

Lift up the ends of the parchment or foil liner, and transfer the brownies to a cutting board. Cut into 16 or 25 squares.

30 January 2010

Winter turns to summer with the Smitten Kitchen


Ahhhh, January. In my part of the world, January means warm, sunny afternoons and cool nights. Winter for us is what spring is for people in cooler climates and it's also when citrus fruits come into season. By now, Florida grapefruit and oranges ought to be trickling into grocery stores all over the place and we're up to our elbows in them. I'm not complaining. We get the pick of the litter and most of the specialty citurs fruits that grow here never make it out of Florida. Minneolas, honeybelle tangerines, kumquats, key limes, meyer lemons, bitter oranges, blood oranges, clementines, mandarins, and the list goes on. I could live on local citrus fruit and die a happy man.

A cooking blog I like to read is Smitten Kitchen, written by Deb and Alex Perelman. Deb's a chef's chef and she prepares her delicacies in a 46 square foot kitchen on New York's Upper West Side. I love her take on food. She doesn't believe in fuss or unnecessary complication, she's about flavor and hospitality instead. Her recipes prove beyond a doubt that great food isn't dependent on fancy equipment or posh ingredients. Great food is an attitude as much as anything.

Anyhow, Deb and Alex featured a recipe that I'll be having for lunch today. I'll let you know how it goes. Here's the recipe.


Mixed Citrus Salad with Feta, Onion and Mint

3 to 4 tablespoons red onion, cut into tiny bits
4 pieces of citrus, preferably a mix of grapefruits and oranges but use what you can get, and what you like to eat (spoiled by the spread at the store, I used 1 pink grapefruit, 1 cara cara and 1 blood orange, and 1 mineola)
1 tablespoon red wine vinegar or lemon juice
1 teaspoon smooth Dijon mustard
1 tablespoon olive oil
Salt and freshly ground pepper, to taste
3 to 4 tablespoons (1.5 ounces) feta cheese, chopped or crumbled
1 tablespoon fresh mint, chopped or cut into tiny slivers

Place your red onion in the bottom of a medium bowl. Nest a strainer over the bowl.

Prepare your citrus fruits by beveling the stem end of one, cutting enough off that you reveal the pith-free flesh of the fruit. Repeat on the other end. Rest your fruit on one of its now-flat surface and begin cutting the peel and pith off in large, vertical pieces. You want the fruit’s exterior to be “white”-free.


Turn the fruit back on its side and cut it into 1/4-inch thick wheels, removing any seeds and thick white stem as you do. Place the wheels and any collected juices from the cutting board in the strainer over the bowl with onion. Repeat with remaining citrus fruits. (As the extra juices drip over the bowl, it will soften the raw onion bite.)

Spread the fruit slices out on a platter. Scoop out the onion bits (a slotted spoon or fork does the trick) and sprinkle them over, leaving the juice in the bowl. Whisk one tablespoon of juice (this is all I had accumulated) with red wine vinegar or lemon juice, Dijon and olive oil. Season with salt and freshly cracked black pepper. Drizzle the dressing over the citrus, sprinkle with feta and mint, adjust salt and pepper to taste, serve immediately and daydream of warmer places.

Recipe and photos from Smitten Kitchen

27 December 2009

Let's paint my living room (or yours)


I have an army man green wall in my living room and I hate it.

I didn't hate it when I painted it of course, but it is time for a change. I painted it a little more than five years ago and I remember the weekend well. It was in the autumn of 2003, and the west coast of Florida was hunkering down for a hurricane warning. This was before 2004's hurricane season from hell. Back then, I never really understood how dangerous and damaging a hurricane could be. Within a year though, Hurricanes Charlie, Jeanne, Francis and Wilma would come along and beat the crap out of us and instill in me a profound respect for  the nightmare scenes the Gulf of Mexico and the Atlantic Ocean can throw at us here in the sunshine state.

So anyhow, in the fall of 2004 we were hunkering down to wait out another storm's passing and I planned to paint an accent wall in my living room to pass the time. Accent walls were all the rage then and the army man green I picked was very much on trend. There was a moment back then when black-greens were the last word. That moment passed about six months after I painted that wall.

I've groaned at the sight of that wall every time I've come home for the last four-and-a-half years and it is time. So how much paint to buy?

Well, I'll tell you. There's a rule of thumb when it comes to paint coverage and like all rules of thumb, it's a guideline more than it is a hard and fast rule.

A gallon of paint will cover 400 square feet of fully prepped and smooth wall. So take the area of the walls to be painted in square feet and divide by 400 and you'll know how many gallons you'll need. So measure the height and width of each wall in inches. Multiply those two numbers the divide the result by 144 and it will give you the area in square feet.

So a perfectly square room where each wall measured 10 feet by ten feet would give you 400 square feet of wall. A gallon of paint would paint a single coat on that whole room. A second coat would mean you'd double the gallons of paint you'd need. Make sense?

So now that I know how many gallons of paint I need, where do I go to get the motivation to actually paint?

20 December 2009

Mammy's little baby loves shortbread


Amid the murmurings that followed Kevin's brilliant post on what used to be a private and quiet Christmas tradition in St. Pete (well, maybe not quiet), a heard a voice calling out for a good Christmas cookie recipe. Well, here's the best one I have.

I love shortbread with something that borders on an obsession and I played around with if for years until I perfected a recipe that produces a buttery, somewhat salty, somewhat sweet and perfectly sand textured shortbread. The ingredients couldn't be simpler, the art to this one comes from the perfect oven temperature and time spent therein.

I used to try to make these with a spoon, but they have to be of a uniform thickness or they won't have the right texture. On a lark I bought a cookie gun one year and it yielded the perfect shortbread cookie. Who knew? Some people call them cookie presses, but I call it a cookie gun. It makes me feel more macho that way.


Anyhow, I bought a Wilton Cookie Press (gun! it's a gun!) Pro Ultra 2. It's perfect --plenty of shapes and it's easy to load and clean.

My Ultimate Shortbread


Ingredients

  • 1 cup butter, softened 
  • 1/2 cup confectioners' sugar 
  • 1/4 cup cornstarch 
  • 1 1/2 cups all-purpose flour 

Directions

  1. Preheat the oven to 375 degrees F (190 degrees C).
  2. Whip butter with an electric mixer until fluffy. Stir in the confectioners' sugar, cornstarch, and flour. Beat on low for one minute, then on high for 3 to 4 minutes. Drop cookies by spoonfuls 2 inches apart on an ungreased cookie sheet.
  3. Bake for 8 minutes in the preheated oven. Watch  them like a hawk. Pull them out of the oven at precisely 8 minutes or they will scorch. Once they're out of the oven let them cool for a couple of minutes and then transfer them to a cooling rack. Sprinkle them with powdered sugar while they are still hot if you'd like.

That recipe will make enough shortbread to feed an army but fear not. Take the extras, throw them in a food processor, grind 'em up and make an amazing crust for a cheesecake.

17 December 2009

From the Pantry: Food and Mosaic

I've enjoyed reading the posts from Paul's guest bloggers. Now it's my turn, and I'm glad he put me at the end. You all are a tough act to follow, but reading your wonderful observations and reminiscences gives me the courage to be creative. Here goes:

My family recently visited our good friends in Madrid over the Thanksgiving holiday. Matthew and Catherine Meacham have always had great taste in design. Their new home, designed by Barcelona architect Tonet Sunyer, is no exception. The house is clean-lined and filled with light. Thoughtful, intelligent design is the theme. Here's a view of the patio and pool. I'm enamored with the brushed bronze cabinet doors which look like a wall, but store everything one needs to host a fabulous party - out of sight.


Everything is built-in, as you would expect in a modern kitchen. What grabs you, though, is the unusual pantry. It's a walk-in galley behind the stove and sink wall.

Food styling takes on a whole new meaning when the guts of your pantry are visible 24/7. Most of us would cringe at having to keep our foodstuffs neatly organized and visually appealing. And the Marmite Heirarchy. Who can keep up? Small, medium, jumbo? Catherine is quick to point out a distinct advantage: from her vantage point at the kitchen table, she can sit and make her grocery lists just by scanning the pantry shelves. My husband rushed out to The Container Store as soon as we got back to Texas, and soon had our two daughters "tiering" the cans in our own pantry. It's still not pretty, but at least now one can find the Progresso soups behind the cannellini beans.

My favorite part of the kitchen was the built-in coffee center which makes any type of brew, from macchiato to lungo at the push of a button. Here is my daughter Kate's favorite part:

That would be the family's pet turtle, wintering in the kitchen with some fresh greens. During warmer months, he has free reign in his own Zen terrarium:

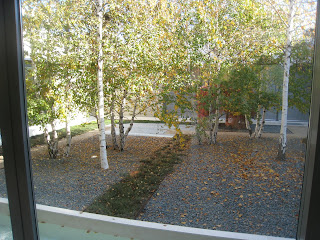
That's the interior courtyard of the home. The trees are on an "island" surrounded by a shallow trough of water. Probably takes the turtle all summer to make a lap.

And now for the holiday/food portion of our show:
Food as Mosaic. Mosaic as Food

Anyone who knows me well knows my second-favorite place to be after my mosaic studio is the kitchen. Sometimes I have trouble distinguishing between the two. Clients request mosaics shaped like food; evil friends challenge me to make absurd constructions out of food, often requiring me to cut said food into tiny, mosaic-like pieces.

A case in point: recently my friend Laura, aka "Shot Girl" (to be explained later), challenged me to create a 14-layer cake for my daughter Claire's 14th birthday. I read the blog she attached to the challenge. Easy enough. After placing the 7th layer, I started giggling uncontrollably. By myself. For three hours, which is how long it took to bake 14 individual cake layers using only three round pans. Eventually I decided I could have made large pancakes on my griddle and frosted them with chocolate.

See what I mean about pancakes? This is after nine layers, and it was starting to feel precarious.
But the end result was great. The best part of all was having Claire tell me, "Mom, all my friends thought the cake was AWEsome!"

Last summer I pre-empted Shot Girl with a challenge: bring an appetizer to our party which could be made by ingredients found at a random convenience store between her house and mine. As usual with Shot Girl, things got artsy:

The Slim Jim log cabin. Smelly. Greasy. Totally unappetizing once you've notched each log on both ends and watched in horror as orange grease oozed out of this food product all over your hands. An "A" for effort.

By now you might be suspecting that Shot Girl and I share an obsessive-compulsive trait. In case you still doubt, a few prime examples follow.

I annually drag out the Victorian gingerbread cottage mold. One year I compulsively attached candy-coated sunflower seeds (they look just like tiny Christmas lights!) to the icicles on the roofline. The candy cane trees are store bought; I won't let the kids unwrap them because I use them every year.
For a Scottie-loving neighbor, Hollydogs; left over from a Texas-themed tree decorating contest, a cactus; and I always include the Man in the Moon for our atheist guests.

One year I got carpal tunnel from decorating too many bitty stars and snowflakes. So last year I cut back and simplified the patterns. In addition to geese, I sometimes make roadrunners (again, the Texas tree leftovers). Whenever I see this goose I think of Miss Piggy and the Muppets singing, "Christmas is coming, the goose is getting fat..."

People love to eat 24 k gold. It's so decadent. I dusted these with gold powder purchased from Maid of Scandinavia. It's edible, expensive, and irresistible on desserts.

Last year when my friends wanted to throw a small cocktail party for my birthday, they asked what kind of food I preferred. Tapas should be easy enough, right? I started to panic when the hostess asked to borrow my paella pan only three hours before the party. Surely she wasn't going to attempt her first paella with 20 guests hovering over her? Imagine my surprise when she and Shot Girl showed up with my birthday cake:


That's a Rice Krispie bar paella. Layered with candy seafood and candy vegetables. I suspect this is retribution for the time I brought mock sushi to Shot Girl's birthday party (gummy worms and gummy fish wrapped in Rice Krispies and rolled with green leather that looks remarkably like nori).

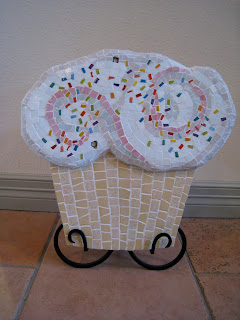
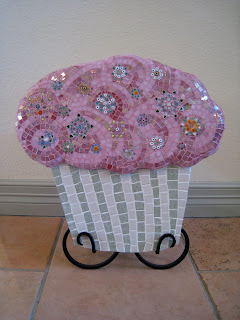
Mosaics as food; now food mosaics: I have a great client who has several of my works in her collection. Last year, she and her daughter opened a clothing boutique in Dallas called Betty Cupcake. Who do you call when you need mosaic cupcakes? Yours truly, natch.


I leave you with a party shot, to continue the theme of Paul's fun friends who enjoy being ridiculous with the ones they love most. Last year, we hosted a Superheroes and Villains party. "Come out, come out, whoever you are!" said the invitation. We asked folks to come as their alter-ego. Some didn't really get it. Others, they really got it.

The essential gang: King Kong; Corkscrew Man, here to save the picnic; Rolodexia, Mistress of Referrals (me); Paparazzi Scum; Shot Girl (tonight she's your friend, tomorrow she's your enemy); The Baconator (who doesn't love bacon?) and Perception Man. Wouldn't it be great if some day all of our absurd friends came to the same party?

That's it for me, Paul. I have now given up my dreams of hosting my own blog; I've given you everything I have. Happy holidays to all and a prosperous and healthy 2010.

- Julie
www.juliericheymosaics.com

29 November 2009

Dishwasher troubleshooting

The following is lifted entirely from the blog for Warner's Stellian. Warner's Stellian Appliances is a terrific, independent appliance retailer with seven Minnesota locations. Additionally, Warner's Stellian also sells over the web and delivers nationwide. Get this, if you spend more than $1999 [edited to clarify that it's not $1900 combined, that's $1900 for an appliance (which is not hard to do) --sorry for the confusion], they will ship your appliances at no charge. If you're in Minnesota and you need qualified appliance information and service, head on over to one of their locations. If you're anywhere else and looking for the same thing, spend some time on the Warner's Stellian website.


Dishwasher troubleshooting: Dishes not clean
By Julie Warner

Thanksgiving means two things: lots of food and lots of dirty dishes. And more dirt requires more soap, right?

WRONG.

Despite what you might think, too much soap can actually prevent your dishes from getting clean —especially on the top rack.

You should only use about half the amount of detergent recommended on the package. And if you have a water softener, you need only 1-2 teaspoons of powder — even less if you use liquid.

Too much soap can cause over-sudsing. Our customer service representative Maghan explained to me that the dishwasher tries to drain as much of the soap suds and food residue as it can. But when too much soap is used and it produces  so many suds, the dishwasher can’t drain it all in the time allowed.

So instead of draining, the soap bubbles pop inside, redepositing tiny food particles back onto the dishes, which show up most on glassware and silverware.

How do you know if you’re over-sudsing? Run a cycle without any soap. If suds are left at the bottom of the tub, you’re over-sudsing.

To remedy, we suggest a “vinegar cycle”:
  1. Empty any dishes and shut soap door, without adding any detergent
  2. Run dishwasher until it gets to the wash cycle
  3. Open the door and check if the dispenser flap has opened
  • If it hasn’t, run for another minute or so until the flap opens
  • If the flap has opened, add the 1 cup vinegar and run through the full cycle.

You might have to repeat the process two or three times to ensure you’ve eliminated the build up of soap. Maghan also suggests trying a dishwasher cleaner like Glisten or Dishwasher Magic.

And I’ve said it again but I will continue to harp on about using rinse aid. It’s not just for looks, people! Maghan reminds us dishwashers today come designed to use rinse aid to help dry, as they lack a built-in fan.

So remember: gorge on turkey, just go easy on the soap, OK?

This entry was posted originally on November 23, 2009 at 2:59 pm

You can follow Julie Warner on Twitter: @WarnersStellian.

25 November 2009

Making your own pie crusts is as easy as, well, pie


It's Thanksgiving tomorrow and in keeping with my one man crusade against convenience foods, I am dipping into my time-tested recipe box. Actually, I don't have a recipe box. I have a file in my computer that's called "recipe box" though.

I am a pie man, through and through. Few things give me the pleasure of cranking out pies in anticipation of major holidays. Thanksgiving is my day to shine thank you very much and nothing says Thanksgiving to me like a real pie or pies as the case may be. And by real I mean made from scratch.

I am a self-taught baker. My mother was a skilled cook and my grandmother too. But kitchens were woman turf and though I watched them bake on holidays I wasn't allowed anywhere near the action. It wasn't until I got out on my own that I realized that I not only like to bake, I'm actually pretty good at it.

I know, I know, I hear it all the time; "We're too busy nowadays to bake from scratch." Well, I'll be the first one to tell you that that's a damn lie. I have a schedule that would kill a lesser man and somehow I manage to cook dinner for myself every night and turn out a hell of a spread of baked goods on holidays. Nobody's too busy, but people have different priorities. Having different priorities is fine, just own that. Telling yourself that you're too busy is what makes you neurotic.

I have a real problem with convenience foods. I don't care that they're not organic or that they're mass produced. What bothers me about them is that they're tasteless. It bothers me too that I can't tell what's in something that's prepackaged. Scratch baking keeps me in control of what I put in my mouth and it also makes me expend some effort before I get a reward. Self-discipline never sleeps kids.

So here's my recipe for pie crust, the first step toward a blue-ribbon apple pie like mine. This recipe's also perfect for the bottom crust of a tartine, but that's a topic for another day. Making pie crusts is not hard, despite what everybody says. All it requires is that you pay attention. Try this, just once, and you will never buy another convenience food for the rest of your life.


2-1/2 cups of all-purpose flour
1 teaspoon of salt
1/2 teaspoon of sugar
1 cup of cold Crisco
1/2 cup of ice water

Put everything, including the bowl,  in the refrigerator for an hour before you start. Then mix the flour, salt and sugar together in the now-chilled bowl. Cut the chilled Crisco into small pieces and work it into the dry mix with a fork. When the Crisco and the dry mixture are blended, it will have the consistency of coarse meal.

Add the cold water in small drips and drabs and work the dough after every addition of water. After you have a quarter cup of the water worked in, slow down and start to test the dough after each time you add more water. Test the dough by squeezing a pinch between your fingers. If it's crumbly, then add more water. When it holds its shape and approaches the consistency of Play-Doh, stop adding water. Work the dough into a ball with your hands and wrap it in plastic wrap. Then put it back in the refrigerator. After an hour or so, cut the ball into two halves. The amount above will yield more than enough dough for a two crust pie.

Happy Thanksgiving!

15 September 2009

Ready to renovate? Take a moment and breathe first.

I got a series of panicky phone calls yesterday from an otherwise rational client who was having her back splash tile installed yesterday. Back splash tile is usually the last element that gets done in a kitchen renovation and this client was in the final week of her six week construction project and she must have reached the point where she couldn't handle it any more. The material being installed was a glass tile we'd spent weeks selecting back in June. In fact, it was the first thing she picked in that whole process and it remained a constant through the whole selections phase of her project. Back in June, she was in love with that tile.


I dropped what I was doing and ran up to her job site to see what could be done. I'd sold her the tile and I wasn't going to take a return so what there was to do was calm her down. Over the years, I've found that the best way to counteract panic is to get even more measured and calm than I am usually. Inside, there was a knot in my stomach but I was determined to come across like the Dalai Lama if it killed me.


It took about an hour to talk her down from the ledge and let the tile setter finish his job. Her chief complaint was that the tile looked somehow different going in than it did in the mocked up sample I'd made over the summer. It took a little digging, but eventually I figured out that her tile looked different because it hadn't been grouted yet. My mocked up board was fully grouted and what she fell in love with was the finished tile. It never occurred to her that ungrouted tile would look so different from the finished product and I had seriously underestimated her inability to see the finished project as it would be rather than what it looked like when it was going in.


I have the vision thing, all of us do who are involved in any kind of work that involves designing how something will look eventually. Most people don't have the vision thing and that's OK. I strongly suspect that the vision thing is an aptitude --it's something you're born with. I go overboard accommodating my clients' inability to visualize their finished projects but in this case, I now know that I hadn't gone far enough. But when I look back and remember that this tile panic was coming on the heels of a lighting panic, a granite panic, a cabinet color panic, a hardware finish panic and a flooring panic I realize that the only way I could have gone further overboard would have been to put her on an airplane and sent her away for two months. I've spent a lot of time being the Dalai Lama since construction started on this one six weeks ago. It happens sometimes.


So the lesson here is to do a better job of identifying the people who need extra reassurance before they actually need that reassurance. If you're considering a renovation, keep a couple of things in mind. Now that I'm thinking about it, here's a list. Print this out and tape it to your fridge.
  1. Any renovation job will cost more and take longer than you think it will. Don't start spending money until you have accurate estimates of the costs of everything associated with your job and the time frames it will take for all of your components to arrive and be installed.
  2. When you're getting prices and someone gives you a range rather than a set price (this happens a lot with labor costs and it's perfectly normal), use the high price in the range in your budget. That way, if the total comes in lower than the high price, you get a happy surprise instead of a miserable one.
  3. When someone gives you a delivery window or range (this happens a lot with lighting in particular and again, it's perfectly normal) use the further away date. So when you hear "four to six weeks" don't get attached to four weeks. Assume it will be six. Again, set yourself up to be pleasantly surprised rather than disappointed.
  4. When you're getting ready for construction to begin, make a "safe place" somewhere in your house. If it's a kitchen renovation you're about to embark on, set up a temporary kitchen somewhere. Move a microwave, dishes, food, a coffee maker, etc., somewhere near a utility sink or into a bathroom so you can have everything in one place when you go to make something to eat or start your day.
  5. Leave your bedrooms clear and uncluttered, don't use them for storage when you empty out the rooms being renovated. Keep your bedroom that way it is normally. After a couple of weeks of camping out in a bathroom and dealing with noise and dust, it's tremendously helpful to be able to go into your bedroom, close the door and retreat into normal.
  6. Don't hover over the people who are working in your home. If you're working with a designer and a contractor you trust, let the people who work for them do their jobs.
  7. Don't judge partially installed work unless you have the vision thing. In mid installation, nothing looks the way it will when it's done. Tile looks very different before it's grouted, kitchen cabinets look awful before they have counters on them, appliances are enormous when they aren't in position and dings and nicks in the walls get fixed at the end of a project.
  8. If you find yourself feeling overwhelmed, that's normal too. Take a walk, get out of the house, breathe, call your designer. Don't panic. Ever. There's always a solution and just as there's always a solution, the only way you can find it is with a clear head.
  9. You will spend a lot of money and be seriously inconvenienced but it will be worth it in the end. Anticipate in advance how you deal with messes and disruption and take steps ahead of time to prepare yourself, physically and emotionally.
  10. Finally, your memory of your renovation will always be less traumatic than your experience of it. Count on it.

26 August 2009

This Labor Day, keep yourself healthy by keeping your pool healthy


After my post from 23 July, Don't try this at home, I got embroiled in a bit of a dust up with a bunch of fuzzy-thinking folk who honestly believe it's some kind of a noble and healthy thing to provide your kids with an unchlorinated pool. By the end of it, I'd been accused of everything from being a shill for the "Chemical Industry," whatever that is, to being a Republican. Whatever. Anyhow, the bright side of that experience was my exposure to a website called Healthy Pools.

Healthy Pools is dedicated to the safe and healthy enjoyment of pools and spas the the public outreach they do is a tremendous public service.

The following is a list of myths and facts that came from Healthy Pool's website.


Myth
I can’t get sick from swimming in a pool.

Fact
Swimming is a fun and healthy activity. However, swallowing, breathing, or having contact with contaminated water from swimming pools can spread illnesses. In fact, the number of outbreaks associated with swimming has increased over the past decade.


Myth
Clear pool water means clean pool water.

Fact
Microorganisms can be present even in pools that appear clean. What you smell, feel, and hear can help you sense whether you’re swimming in a healthy pool.


Myth
All germs that can cause illness are immediately killed by standard pool cleaning chemicals, such as chlorine.

Fact
Chlorine kills germs that can cause illness in pool water; but it takes time. While chlorine eliminates most within minutes, some germs such as Cryptosporidium can survive in a properly treated pool for days.


Myth
When I smell the strong odor of pool chemicals, it means the swimming pool water is very clean.

Fact
The heavy chemical odor is not from chlorine. It means that unhealthy chloramines have formed in the water, created from the mix of chlorine and contaminants. Chloramines are not as effective in disinfecting swimming pool water. A well-maintained pool has little odor.


Myth
When I get red eyes while swimming, it means there is too much chlorine in the water.

Fact
Red eyes and itchy skin are usually caused by improper pH or high chloramine levels. Surprisingly, the pool may actually need additional chlorine treatment to get rid of chloramines and sanitize the water.


Myth
I only need to shower before going into the pool if I haven’t bathed that day.

Fact
All swimmers should shower before entering the pool. Perspiration, body oil, urine, and other waste are with us at all times. Without showering, it all comes with us when we go swimming.


Myth
As long as a child is wearing a diaper in the pool, there’s no chance for a contamination of the water.

Fact
“Accidents” from diapered children pose a risk of contamination. To minimize this risk, parents must wash children thoroughly, front and back, with soap and water, and make sure a clean, form-fitting “swim diaper” is worn by the child at all times. Just remember that swim diapers are not leak proof


Myth
Keeping a swimming pool clean and healthy is the lifeguard’s and pool manager’s responsibility.

Fact
Employees help keep pools clean, but they cannot be your only defense. Each one of us has a responsibility to follow good public health practices, stay alert for unhealthy conditions, and report problems when they occur.

Thank you Healthy Pools!


10 August 2009

DIY Kitchen Project: Infused Vodka


Hey everyone! Since Paul's outta town, let's all raid his liquor cabinet and have ourselves a party!


Just because times may be tough doesn't mean you need to skimp out on fancy hooch and late summer cocktails, especially with an upcoming season of "Mad Men" on the way. So in the 'sprit' of leaving kitchen renovations to the pros, I present to you a DIY kitchen project you surely won't screw up on!


What you will need:


* Vodka (the cheap stuff from the bottom shelf)

* Cucumber (english)

* Lychees (fresh or canned)

* Glass jar with lid

* White cranberry juice (but red will do)

* Cocktail shaker

* Martini glasses


So if you didn't already know, I am from Hawaii, a.k.a. "the Aloha State", home to beautiful beachfront hotels serving cocktails such as the Mai Tai, Tropical Itch & the famous Blue Hawaii (the latter of which no self-respecting Kama'aina would ever be caught drinking) However, if you venture out of Waikiki and visit a non-tourist restaurant or bar, you will find that one of the more popular cocktails is the Lychee Martini -- and today I am going to show you my personal take on this favored local drink.


drink these in secret, if you must ...


So I was thinking earlier about how I would describe the taste of a Lychee to someone who has never tried one before ... I would have to say is that it is a subtly flavored lightly sweetened fruit, with a very delicate texture, perfume, and taste. Other than that I really cannot describe it, nor can I compare it to any other fruit. The best I can come up with is that it tastes like a very pale lavender; not the herb, but the color. (If you are reading this and can describe the taste of a lychee better than that, then please by all means hit up the comment section below and let the rest of the world know!)


Unpeeled lychees


Lychee trees can be found locally here in Hawaii, and I have seen them growing in California. Native to China, the fruits are protected by a thick, red, leathery shell which must be peeled, and are in season from May to early October. If you are unable to find fresh lychee where you live, visit a specialty or Asian grocery store, and you are sure to find them year-round in the canned fruit section. Or, if like me, you don't enjoy peeling lychees, then canned is definitely the way to go!


The infused cucumber will add a slightly earthy, exotic, fresh kick to the lychee vodka that I think nicely balances the resulting cocktail, and makes it a little more masculine -- however if you choose to leave it out and only use lychee, that's fine too!


Ok, now to begin: start by slicing the cucumber in even slices, about enough to fill up half your jar. Then peel the lychees (if fresh) and remove the seed in the middle of the white fleshly center. Make sure all of the peel is removed as well as the stem before placing the fruit into the jar.


If using the canned lychees, remove all but a few of them from the syrup (reserve the syrup), and add them into your jar, leaving a little bit of room near the top of the jar.


Now comes the hard part: open the bottle of cheap vodka and pour on top of fruit. Close the lid and stick in the freezer. That's it. :)


You want to keep the jar in the freezer, taking it out every day to give it a good shake and check on it's progress, usually for about a week. There is no exact science involved, and I usually declare it's ready when it smells good to me (i.e. a strong fragrance of lychee and cucumber, upon opening). Then strain the liquid into a bowl, dump the lychee and cucumber, rinse the jar and pour the liquid back in, and store your infused vodka in the freezer.


You may be thinking, "What?!? I have to wait a whole week? After peeling all those damn lychees?!?" Remember the lychees & syrup I told you to set aside? Instant gratification! Take your cocktail shaker and add in your remaining lychees & about two spoonfuls of the reserved syrup, to taste (if using the fresh, add a spoonful of sugar). Muddle the lychees with a spoon, then add a lot of ice and about 4 oz. of cranberry juice and 2 oz. of vodka (or more) and shake vigorously for at least 30 seconds. You want the ice to continue to crush the fruit to release the lychee flavor.


Strain the now milky white cocktail into two martini glasses, serve and garnish with either a slice of cucumber on the rim, a lychee, or for added sweetness drop a maraschino cherry on the bottom of the glass.


ahhh ... the sun has set, what a nice time for a cocktail ...


A variation could be substituting lemon rind for the cucumber, or eliminate the lychee altogether and go for a lemon-cucumber infusion instead ... and after reading the Jamaica Hibiscus Tea post from yesterday, I am thinking a lychee-hibiscus infusion is in the near future!


Remember to drink responsibly and please, please, please, don't drink & drive :)


Aloha, and feel free to stop by our blog sometime!


-- Adrienne